Gluten free sourdough bread isn’t just a trend—it’s a delicious, nourishing solution for anyone avoiding gluten but still craving that tangy, crusty, real-bread experience. Whether you’re new to baking or just switching up your usual loaf, mastering this style of bread at home is easier—and more rewarding—than you might think. In this guide, I’ll walk you through everything you need to know to bake your own perfect gluten free sourdough loaf, from starter to storage. You’ll find tips from my kitchen, common fixes, and just enough story to inspire your next bake.
Table of Contents
1: A warm slice of tradition: My first gluten free sourdough moment
The first time I baked gluten free sourdough bread, it wasn’t because I had to—it was because someone I loved did. A friend had just been diagnosed with Celiac disease and was missing bread in a way only someone who’s had to give it up truly understands. I remembered the way my grandmother’s sourdough would fill her kitchen with that earthy, tangy aroma. I wanted to bring that feeling back—minus the gluten.
It didn’t go perfectly at first. The loaf was dense, the crust was off, and the starter seemed moody. But over time, with every mix, proof, and bake, I found a rhythm. I learned the importance of hydration, the magic of psyllium husk, and the surprising role temperature played in the rise. That one imperfect loaf became many, and eventually, something beautiful. Something that tasted like memories—but baked for today’s needs.
Now, gluten free sourdough bread is part of my kitchen’s story. It’s not just a substitution—it’s a celebration. A chance to rediscover the joy of crusty edges, chewy middles, and that unmistakable sour tang. If you’re here, maybe you’re looking for that too. And I’m here to say: you can absolutely do this.
Why gluten free sourdough bread matters today
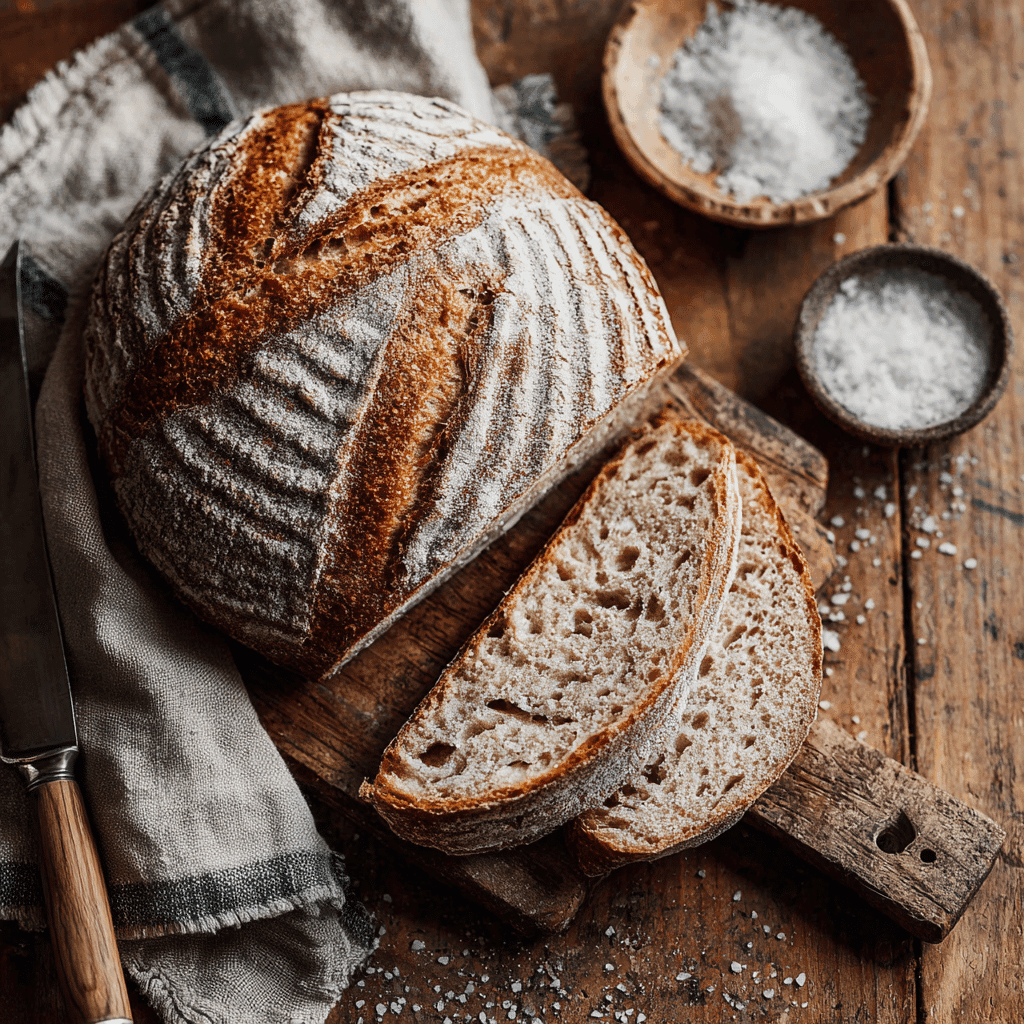
More people are choosing—or needing—to skip gluten than ever before. But giving up wheat shouldn’t mean giving up good bread. That’s where gluten free sourdough bread shines. It’s not just better for those with sensitivities—it’s often easier to digest, thanks to the fermentation process. And when done right, it’s just as satisfying as its traditional cousin.
Unlike most gluten free breads that rely on starches and gums to mimic texture, sourdough offers something real. With the right combination of flours, a well-fed starter, and a bit of patience, your loaf will have a naturally complex flavor, a hearty crumb, and that classic crackle when you slice through the crust. Whether you’re pairing it with a cozy bowl of slow cooker pinto beans or slathering it with avocado, this is comfort food redefined.
2: Mastering the Basics of Gluten Free Sourdough Bread
What flour works best in gluten free sourdough bread?
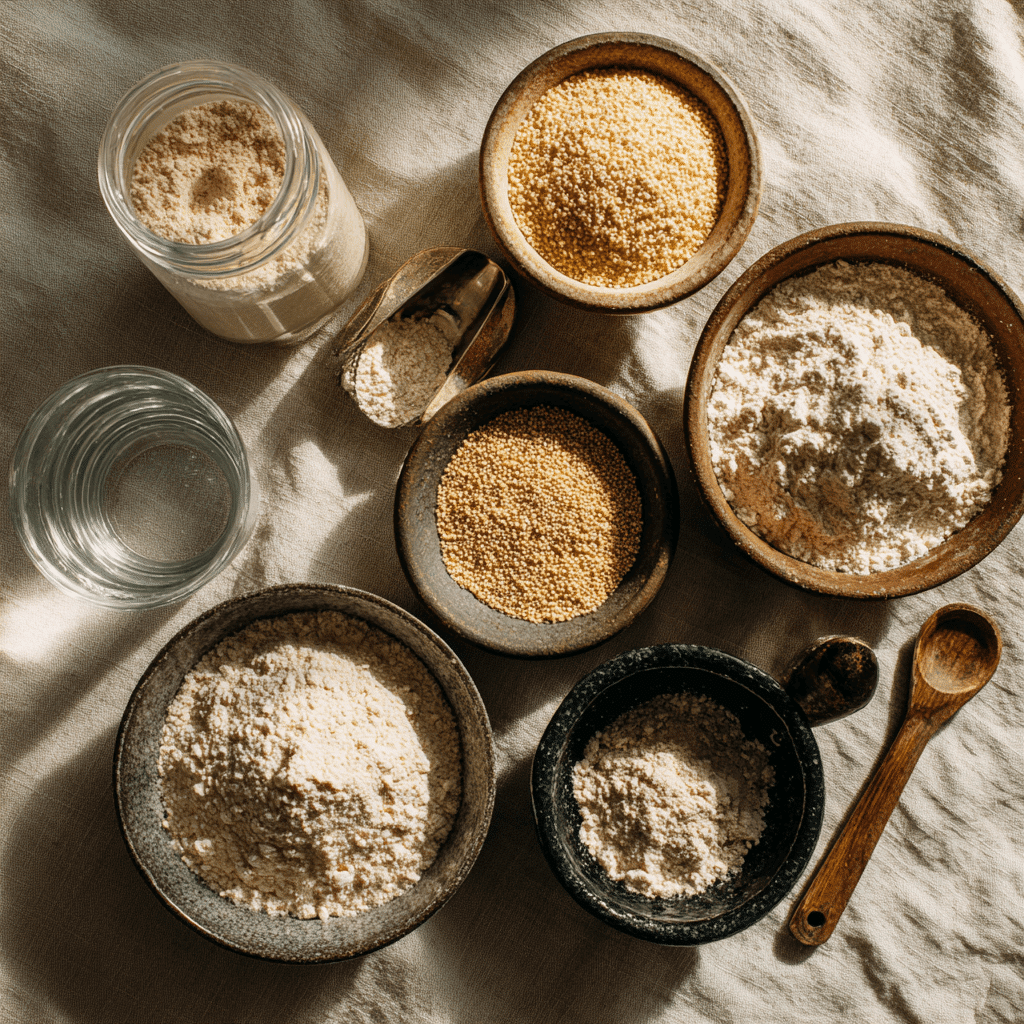
Choosing the right flour is the first—and arguably most important—step to successful gluten free sourdough bread. While traditional sourdough relies on wheat flour for structure and stretch, gluten free baking is a whole different ball game. It’s all about combining the right textures and flavors to mimic that wheat-based result without the gluten.
A good base blend usually includes whole grain flours like brown rice flour, sorghum flour, and teff. Brown rice gives a neutral, mild taste and a soft crumb, while sorghum adds lightness and a slightly sweet note. Teff brings an earthy depth and works beautifully in sourdough’s fermented profile. Millet and buckwheat are also popular for structure and flavor. You’ll want to avoid using just starches like tapioca or potato flour on their own—they add chew, but not enough body.
Some bakers create custom blends, while others swear by store-bought gluten free bread flour mixes designed for sourdough. Just make sure whatever mix you use doesn’t contain gums or leaveners if you’re adding your own binder (like psyllium husk) and using natural fermentation.
For instance, the same attention you’d give to selecting the perfect oat topping for a best peach crisp applies here—balance is everything. Don’t be afraid to experiment and take notes.
Starting your gluten free sourdough starter from scratch
Building your own gluten free sourdough starter is both science and art. Luckily, you don’t need much to begin—just flour, water, and time.
Here’s a basic step-by-step to get your gluten free starter going:
| Day | What to Do |
|---|---|
| Day 1 | Mix 30g whole grain gluten free flour (like brown rice) with 30g filtered water in a clean jar. Stir well. Cover loosely. |
| Day 2 | Stir the mixture once or twice a day. No need to feed yet. You might see small bubbles. |
| Day 3 | Discard half. Add 30g flour + 30g water. Stir. Cover loosely again. |
| Days 4–7 | Continue feeding every 24 hours (or every 12 if it’s rising fast). Keep it warm—around 75–78°F works best. |
| Day 7+ | If it doubles in size within 4–6 hours of feeding and smells pleasantly sour, your starter is ready. |
Some gluten free flours are faster starters than others. Brown rice and sorghum typically do well. Don’t worry if it takes longer—sometimes a starter needs up to 10 days to truly come alive.
You’ll also want to use filtered or dechlorinated water to avoid harming the wild yeast. And remember: don’t switch flours mid-process. Stick with the same one for consistency.
When your starter is active and bubbly, you’re ready to bake. It’s a process, yes—but one that rewards patience. Think of it like seasoning a new pan or slow-roasting garlic for your next easy chicken dinner—once you’ve done it, it just gets better from there.
3: Baking Like a Pro with Gluten Free Sourdough Bread
How to bake gluten free sourdough bread that rises well
Getting gluten free sourdough bread to rise properly can feel like a small miracle, but it really comes down to technique and understanding your dough. Since gluten isn’t around to trap gas and provide structure, you’ll need to rely on a few trusted strategies to get that beautiful lift.
First, hydration is key. Most gluten free doughs need more water than wheat-based ones—anywhere from 85% to 100% hydration is common. That means if you’re using 500g flour, you might need 425g–500g water. It’ll feel more like a thick batter than a classic dough, and that’s okay.
Second, psyllium husk is your secret weapon. Just a small amount (usually 2–3 tablespoons per loaf) turns a runny mess into a structure-holding dough. It creates the gel needed to trap fermentation gases and hold shape during baking. If your dough feels stiff or cracks during proofing, increase the psyllium slightly.
Room temperature plays a big role too. Aim for a warm, draft-free space—around 75°F. Cold environments slow yeast activity and make rising unpredictable.
Scoring the top of your dough right before baking helps release steam and control rise. And don’t skip the steam! Bake with a lid on your Dutch oven or add a pan of hot water to your oven for that first 20–30 minutes. This helps the crust stay flexible long enough for a great oven spring.
The first time I got a gorgeous dome on my loaf, it reminded me of the feeling I had pulling a perfect banana bread out of the oven—proud, relieved, and very hungry.
Solving common sourdough problems (dense or gummy texture)
You followed the recipe. You used the starter. And still… your gluten free sourdough bread comes out gummy or dense. What happened?
Here’s what most often goes wrong—and how to fix it:
- Starter wasn’t strong enough: If your starter isn’t rising and falling reliably before baking day, it might not have the yeast activity needed. Try feeding it twice a day for a few days before using.
- Too much water or not enough binder: High hydration is good, but only if it’s supported by enough psyllium. A watery dough without structure collapses. Try reducing the water by 10% or increasing the binder slightly.
- Underbaking: Gluten free loaves often take longer to cook through. Make sure you’re baking at least 60–70 minutes at 450°F, and let the loaf cool completely before slicing—it continues to set as it cools.
- Proofing too long: Overproofing breaks down the structure of your dough, causing collapse. Once your dough rises 1.5–2x and shows small bubbles, it’s ready.
- Wrong flour blend: Some blends just don’t behave well in sourdough. If your current mix stays dense no matter what, try changing the base flour or removing heavy starches.
Troubleshooting bread can feel discouraging, but it’s all part of learning. Think of it like testing the perfect doneness on crispy salmon bites—trial, error, and tasty rewards.
4: Elevating Your Loaf Game with Gluten Free Sourdough Bread
Flavor add-ins and crust tips for gluten free sourdough bread
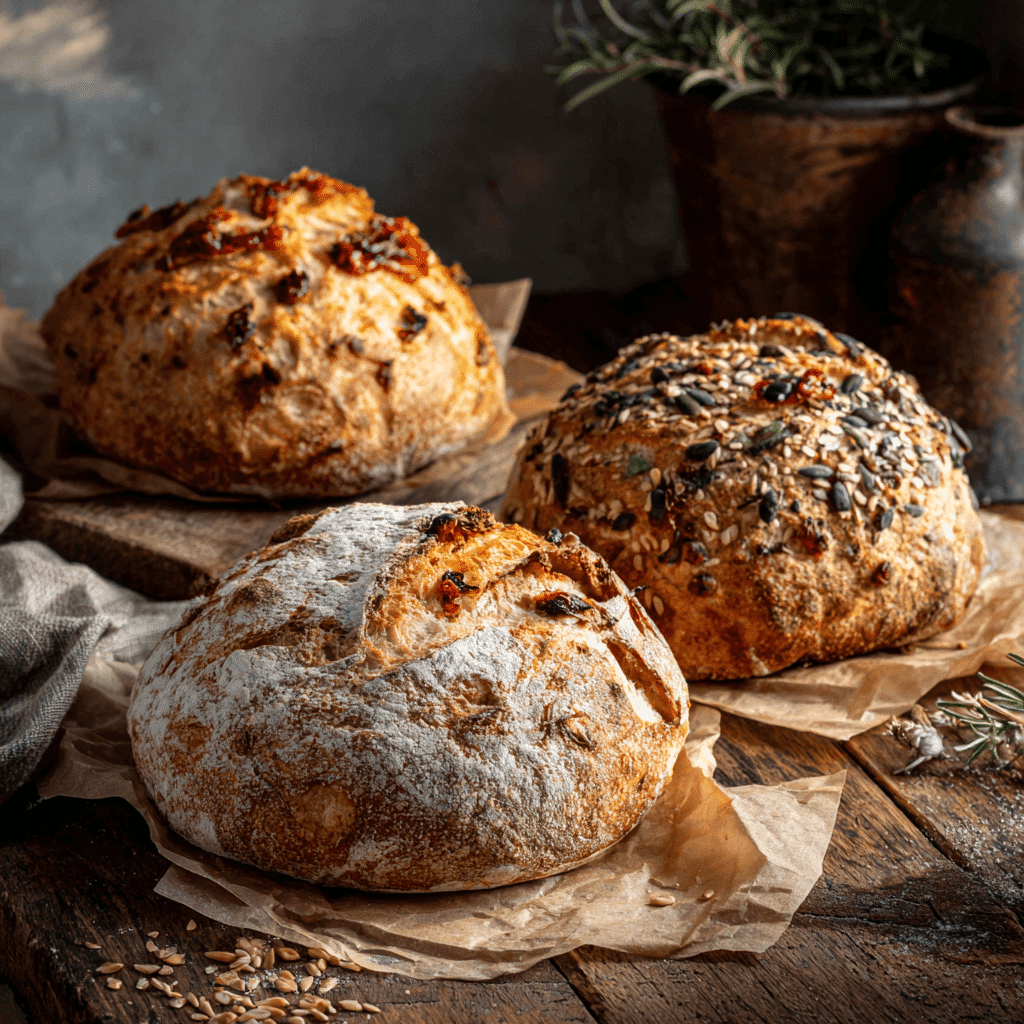
Once you’ve nailed the basics of gluten free sourdough bread, the fun really begins. This is where you can start experimenting with add-ins and crust techniques that transform a solid loaf into something extraordinary.
For flavor, think beyond the basics. Try folding in roasted garlic, sun-dried tomatoes, or chopped herbs like rosemary and thyme just before the final shaping. These add-ins not only boost taste but bring character to every slice. Want a little texture? Mix in chia seeds, poppy seeds, or pumpkin seeds to the dough or press them gently onto the crust before baking.
To get that classic sourdough crunch, a few tricks go a long way. Bake in a preheated Dutch oven for the first 30 minutes to trap steam, then uncover to brown. This steam step gives the loaf a shiny, blistered crust. Mist the top with water before loading into the oven or place a hot tray of water on the bottom rack.
Another great tip? Chill the dough in the fridge overnight before baking. This long ferment develops deeper sour notes and makes the loaf easier to score for that dramatic artisan look. Just like seasoning in your garlic parmesan chicken recipe, the little details matter.
And don’t forget the toppings. A brush of olive oil and sprinkle of flaky salt or sesame seeds right before baking adds the kind of finish that makes each slice feel gourmet.
How to store and slice gluten free sourdough bread like a baker
Homemade gluten free sourdough bread doesn’t last forever on the counter—but handled right, it stays fresh and delicious longer than you’d think.
After your loaf cools completely (seriously—don’t rush this), store it cut-side down on a wooden board or wrap it in a clean kitchen towel. This helps maintain crust while protecting the crumb. Avoid airtight containers unless freezing, as they soften the crust too quickly.
For longer storage, slice the loaf and freeze the individual pieces. That way, you can grab one or two as needed. Toast from frozen or let thaw at room temp. They’re great topped with almond butter, smashed avocado, or served with a comforting bowl of slow cooker pinto beans.
When slicing, use a serrated bread knife and a gentle sawing motion. Pressing down too hard compresses the loaf. You’ve put in the time to craft something real—now slice like you mean it.
Keep a log of what worked: flours used, hydration, proof time, and add-ins. Like your favorite lazy lunch ideas, this habit keeps things simple and repeatable.
for mor recipes follow me in facebook and pinterest
5: Conclusion
Making gluten free sourdough bread at home might seem intimidating at first, but once you understand the rhythm—feeding your starter, proofing the dough, and baking with confidence—it becomes second nature. Every loaf teaches you something new, and that’s part of the joy. Whether you’re baking for health reasons or just because you love a good slice of real bread, this process connects you with tradition, flavor, and creativity.
So grab your mixing bowl, feed your starter, and keep going. Delicious, crusty, gluten free sourdough is 100% within your reach—and your kitchen is about to smell amazing.
How do you make gluten free sourdough bread rise?
Brown rice, sorghum, and buckwheat flours top the list. They’re whole grain, flavorful, and ferment well. Some bakers like teff or millet for earthy depth. You can mix your own blend or start with a gluten free bread flour made specifically for sourdough. Avoid heavy starch-only mixes—they often bake up dense or overly chewy.
What is the best flour for gluten free sourdough bread?
Brown rice, sorghum, and buckwheat flours top the list. They’re whole grain, flavorful, and ferment well. Some bakers like teff or millet for earthy depth. You can mix your own blend or start with a gluten free bread flour made specifically for sourdough. Avoid heavy starch-only mixes—they often bake up dense or overly chewy.
Why is my gluten free sourdough bread gummy or dense?
This happens when the dough lacks structure or hasn’t baked long enough. A weak starter, low binder content, or too much moisture can all contribute. Make sure your loaf hits at least 200°F internally, and always let it cool fully before slicing. If you’re using a new flour, adjust water gradually to get the texture right.
Can you make a gluten free sourdough starter from scratch?
Yes! All you need is whole grain gluten free flour (like brown rice) and water. Feed it daily in a clean jar, and within a week, you should see bubbles, smell a sour note, and watch it double in volume. It takes time, but the result is a lively, yeast-rich starter you can use again and again.

Gluten Free Sourdough Bread: Homemade Magic Without the Wheat
- Total Time: 1 hour 15 minutes
- Yield: 1 standard loaf (8–10 slices)
- Diet: Gluten Free
Description
A crusty, chewy, and naturally fermented gluten free sourdough bread that’s perfect for anyone avoiding gluten but craving traditional sourdough flavor. Made with whole grain gluten-free flours and a homemade starter, this loaf offers a tangy crumb, crispy crust, and nourishing simplicity with every slice.
Ingredients
200g brown rice flour
100g sorghum flour
100g buckwheat flour
400g filtered water
7g fine sea salt
10g whole psyllium husk
150g active gluten-free sourdough starter (100% hydration)
Instructions
In a mixing bowl, combine psyllium husk and water. Stir and let gel for 5 minutes.
Add the brown rice, sorghum, and buckwheat flours, salt, and gluten-free sourdough starter. Mix well until fully combined.
Cover the dough and let it rest for 1 hour at room temperature (bulk fermentation).
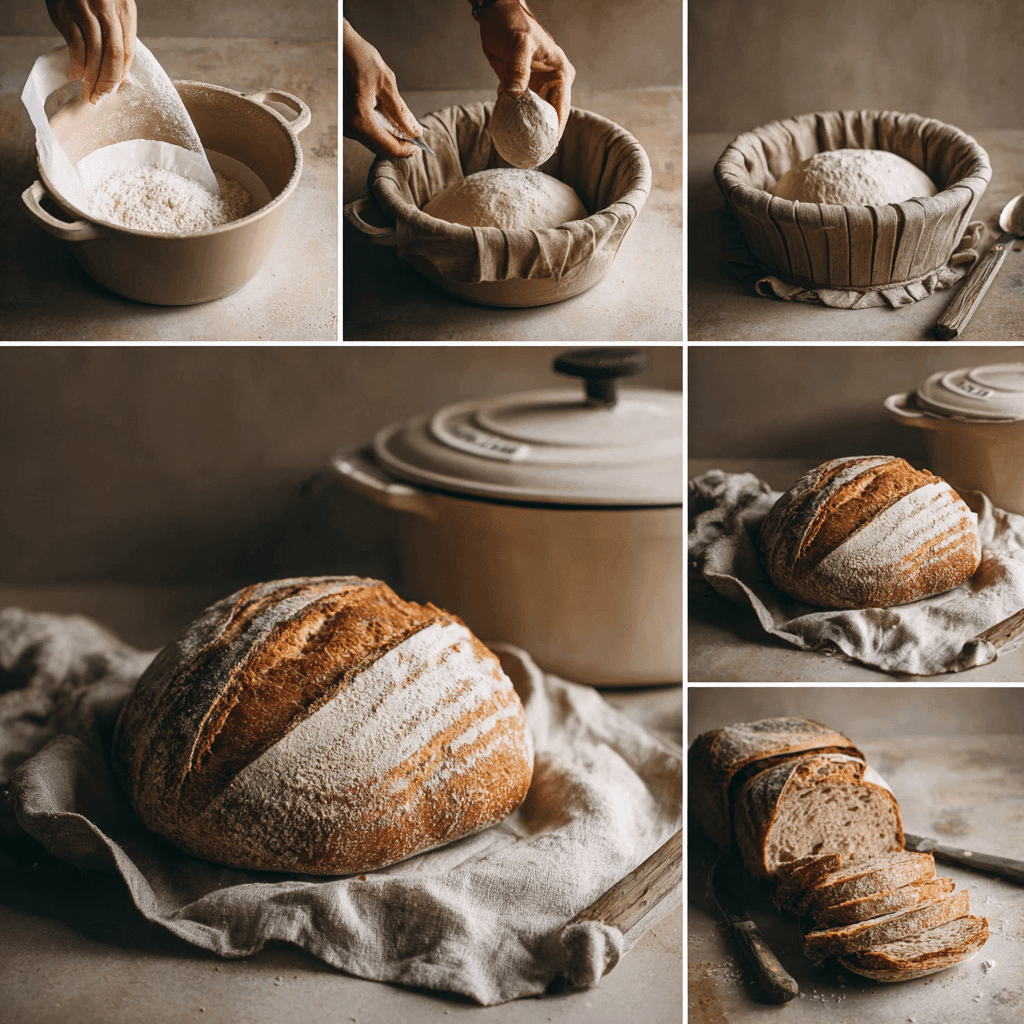
Shape the dough gently and place it seam-side up in a floured banneton or towel-lined bowl.
Cover and let it proof at room temperature for 4–6 hours, or refrigerate overnight.
Preheat the oven to 450°F (230°C) with a Dutch oven inside.
Carefully turn the dough out onto parchment, score the top, and bake covered for 30 minutes.
Remove lid and bake uncovered for another 30 minutes.
Let the loaf cool completely on a wire rack before slicing.
Notes
Always use a mature, active starter for best results.
You can substitute teff or millet flour for sorghum or buckwheat.
Add-ins like garlic, seeds, or dried herbs can be folded into the dough before shaping.
If your loaf seems gummy, extend the bake time by 10–15 minutes and allow full cooling.
For extra sour flavor, use an overnight proof in the fridge.
- Prep Time: 15 minutes
- Cook Time: 1 hour
- Category: Bread
- Method: Sourdough Baking
- Cuisine: Gluten-Free, Traditional European